
 View full-size diagram ↗
A doll eye lash map places the strongest length emphasis through a chosen central area and becomes shorter towards both ends. An open eye lash map is often used to describe the same broad intention: a more open, vertically emphasized appearance. The terms are not a standardized pair of opposites, and open eye does not automatically mean putting the longest extensions at the inner corner.
This guide focuses on the diagram: locating the peak, choosing its width, recording the transitions and keeping the two eyes understandable. For the broader appearance, texture and product-range discussion, start with the separate doll lash extensions guide.
Doll eye and open eye: agree on the meaning first
In a consultation, ask the client what they mean by open. They may want more central height, a lighter outline, less outer heaviness or a result that remains visible when their eyes are normally open. Those requests do not all require the same change to a map.
Some educators use doll and open eye almost interchangeably; others distinguish a softer open-eye outline from a more pronounced doll effect. This vocabulary is useful only when it leads to a shared picture. Draw the intended emphasis and describe the requested density instead of debating which label is universally correct.
BL Lashes’ monolid styling discussion uses doll eye and open eye together. The naming overlap is a reason to specify the actual design, not a reason to treat every example in that article as appropriate for every client.
Find the visual centre on the open eye
The centre of a paper diagram is not necessarily the position where the client wants the most visible emphasis. The artist should assess the eye in its normal open position and choose a practical reference landmark. Record that decision before treating the closed-eye drawing as the final plan.
Eye width, lid coverage and the direction of the natural lashes can change the way a central peak appears. Two clients with the same nominal length sequence may have very different visible outlines. Even the same client can look different in a photograph taken from above compared with a normal frontal view.
Write where the peak begins and ends. “Central emphasis over the selected landmark” is clearer than “12 mm in the middle” if the zone boundaries are uncertain. The numbers only become useful when the drawing identifies the area they describe.
Compare a narrow peak with a broad plateau
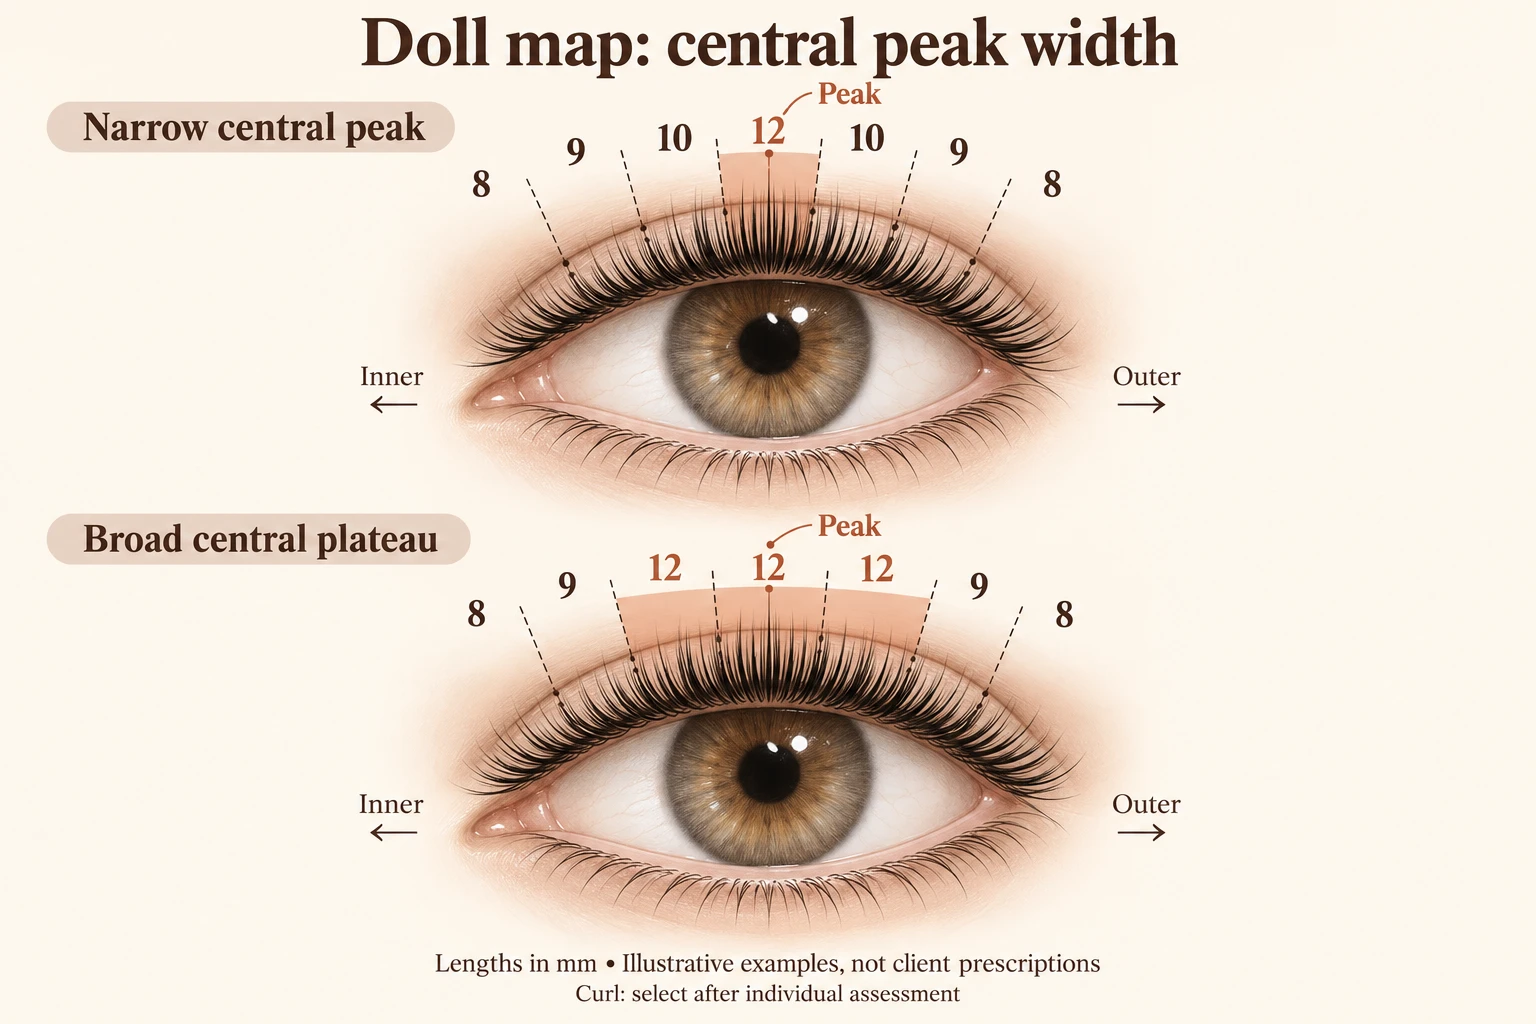
The following examples use seven zones, inner to outer, with hypothetical millimetre values. They are original design illustrations, not suitable lengths for an unidentified client. Both examples have a 12 mm maximum, but they distribute that emphasis differently.
Swipe left or right to compare all columns →
| Example | Inner → outer | What changes |
|---|---|---|
| Narrow central peak | 8 / 9 / 10 / 12 / 10 / 9 / 8 | Emphasis is concentrated in one drawn section |
| Broader central plateau | 8 / 9 / 12 / 12 / 12 / 9 / 8 | Several adjacent sections share the maximum |
| Softer progression | 8 / 9 / 10 / 11 / 10 / 9 / 8 | The contrast between peak and nearby zones is reduced |
The choice is not a contest between a correct and incorrect diagram. It is a decision about the desired outline, subject to professional assessment of the actual lashes. A broad plateau may occupy more visual space than a narrow peak without increasing the maximum number.
If the client likes central emphasis but finds the result too pronounced, review the contrast and width before assuming the whole set needs to be longer or shorter. The worksheet should make those variables visible enough to discuss independently.
Keep the inner corner a separate decision
Open-eye styling should not be reduced to lengthening the inner corner. A design intended to emphasize the centre still needs a transition from the inner section. The final choice must reflect the natural lashes, visibility and the product profile rather than a rule based on a style nickname.
Do not confuse a peak placed slightly inward of the visual midpoint with using the longest extensions at the innermost corner. Those are different locations and can produce different outlines. Draw the landmark instead of using “inner” to describe a broad area of the eye.
Likewise, the outer end should not be forgotten because the centre is the focus. Record the taper towards the terminal section so the map remains clear at both ends. A central number with no transitions is an incomplete design record.
Curl changes the apparent central height
Two extensions with the same printed length can present differently when their curl profiles differ. A stronger rounded sweep, a straighter base or a different transition point can change the visible direction. That is why the map needs a curl reference as well as millimetres.
When comparing C, CC, D or a special profile, inspect the actual product rather than assuming the letter guarantees a specific height. Record the range and the chosen sample. Our C versus D curl guide explains how to compare profiles without changing several product variables at once.
A central emphasis can be discussed with different curl choices. It is not defined by D curl, and a change to curl does not remove the need to assess load, attachment and the lid relationship. The map should show where a profile changes if more than one is being used.
Separate silhouette from density and texture
A doll-eye outline can be smooth, lightly textured or more visibly accented. The map determines the broad distribution of emphasis; density and texture require their own notes. Without those notes, a central sequence may be interpreted as several very different finished sets.
For a textured version, write base lengths and accent lengths separately. An accent located near the centre does not mean that every extension in that zone uses its length. Keep the notation readable enough that another trained artist can understand which values describe the underlying shape.
For a buyer, this means a “doll” assortment is not a complete product specification. Construction, curl, diameter, length distribution and packaging still need confirmation. The style and product-selection article covers that range-planning perspective.
Account for lid coverage and asymmetry
Central emphasis may appear differently where a fold covers part of the lash line. Before increasing length, assess which area is concealed and how the selected curl sits with the eye open. A diagram cannot tell whether the resulting clearance is comfortable.
Record the right and left eye separately when the features or approved design differ. Matching the numbers is not the same as matching the visual balance. Intentional differences in zone width or profile should be documented, together with the client’s preference.
Use the hooded-eye guide for lid-coverage questions and the monolid consultation guide for crease and natural-direction distinctions. Neither label requires a fixed central peak or a universal length increase.
Use a repeatable review method
At the end of a design review, record what was accepted: the position of emphasis, the fullness, the texture and the corner finish. If a change is needed, name the variable. “Reduce central contrast” is more useful than “less doll” because it identifies a feature that can actually be discussed.
Keep comparable photographs only with appropriate permission and use a similar gaze and angle. A close-up emphasizing the upper lid can make central height look much stronger than it appears in ordinary conversation. Consistent records reduce unnecessary revisions based on photography alone.
At subsequent appointments, reassess the natural lashes rather than treating the old map as a permanent instruction. The previous sheet records a design decision at a point in time. It does not guarantee that every product choice remains appropriate indefinitely.
Translate the map into a tray brief
A central-emphasis range needs the shorter transitions as well as the peak lengths. Measure actual component use across the services you intend to support. The number of drawn boxes does not equal the number of tray rows required, because section widths, coverage and construction differ.
For sampling, request the physical curl references and the necessary length range first. Then agree on row allocation, tray labeling and packaging once the team has evaluated the assortment. Avoid using a fixed “doll-eye ratio” without usage evidence.
The specification-sheet guide helps turn that record into a manufacturing brief. The extension collection provides starting products; exact combinations and private-label details are confirmed through inquiry.
Frequently asked questions
What is a doll eye lash map?
It is a map with the strongest length emphasis through a chosen central area, tapering towards both ends. The exact lengths, zone widths, curl and construction are individual decisions.
Is an open eye lash map different?
Sometimes educators distinguish the terms, but there is substantial overlap. Clarify the intended outline with a drawing. Open eye is not a universal instruction to make the inner corner longest.
Does a doll map require a single sharp peak?
No. The central emphasis can be a narrower peak or a broader plateau. The transition and the width of that area influence the appearance as much as the maximum length.
Can the same map be used for both eyes?
It can be a shared starting intention, but each eye should be assessed. Record deliberate differences instead of assuming that identical numbers always create the preferred balance.
Download the blank worksheet, edit your reference in the Lash Map Generator, or return to the complete mapping guide for the full recording method.