
 View full-size diagram ↗
A lash map is a written plan for where extension lengths, curls and textures will sit along the lash line. It connects the client’s requested silhouette to the natural lashes that can support it. A useful map records both eyes, the position of the longest section, the transition towards each corner and any differences between layers. It is a design record, not a promise of retention or a universal prescription.
This guide explains how to read, draw and review lash maps, with natural, cat-eye and doll-eye examples. It also includes a printable blank worksheet and a way to turn an approved map into a salon stock or private-label purchasing brief. The examples use professional extension terminology; they are not instructions for applying professional adhesive at home.
What a lash map needs to communicate
A string such as 8–9–10–11–12–11–10 describes a sequence of lengths, but it leaves several questions unanswered. Which end is the inner corner? How wide is each section? Where does the peak sit on the open eye? Which curl and construction are being used? Are those numbers for the base layer or the longest accents? Until those details are recorded, two artists can interpret the same sequence differently.
The most useful map has three layers of information. First comes the shape: where attention should sit and how the outline rises and falls. Second comes the product specification: lengths, curls, diameter, construction and texture. Third comes the client-specific adjustment: natural lash direction, corner limitations, asymmetry and the observations made at review. Keeping these layers separate makes a change easier to explain.
For example, a client may like the overall central emphasis but want less density. That does not automatically require a new length map. Another may like the density but dislike the heavy outer finish. That calls for a discussion about the peak position and taper. “Make it more natural” is too vague to identify which variable needs changing.
Start with the open eye and the client’s preference
Discuss the intended effect before drawing boundaries. Ask whether the client wants to preserve the existing outline, add central emphasis, extend the outer silhouette or introduce visible texture. Reference pictures help, provided you separate the shape from makeup, camera angle and the fullness of the photographed set. A photograph is a conversation aid rather than a specification that can be copied unchanged.
Observe the eye in its normal open position. Record the visible lid space, direction of the outer corner and the area where the client wants emphasis. Then assess the natural lash line and its individual sections during the professional consultation. An almond outline, a hooded lid and downward-growing lashes can occur together; one label does not replace the other observations.
Do not promise to change the person’s anatomy. Extensions can alter the visual outline around the eye, but a mapping diagram cannot diagnose or correct an eyelid condition. Where irritation, pain or an eye problem is present, the priority is appropriate assessment rather than choosing a more dramatic style.
Mark direction before marking length
Label the client’s right and left eye, then identify the inner and outer ends on both drawings. This matters because the right eye, viewed from the front, appears on the left side of the page. A mirrored sketch without labels is easy to misread. “Outer” is a safer instruction than an arrow that assumes the reader is facing the same direction as the author.
Use a clear landmark for the intended emphasis, described in the client’s normal gaze. Do not assume that the midpoint of a pad is the desired visual centre. Pads, photographs and diagrams can be positioned differently. The record should make sense when reviewed later without the original sketch beside the client.
Seven sections are used in the examples here because they are easy to compare. They are not a required number. A trained artist may use more or fewer zones to describe the actual design. Changing the number of zones should improve the record, not imply that every natural lash must fit a rigid equal-width box.
Three basic lash maps compared
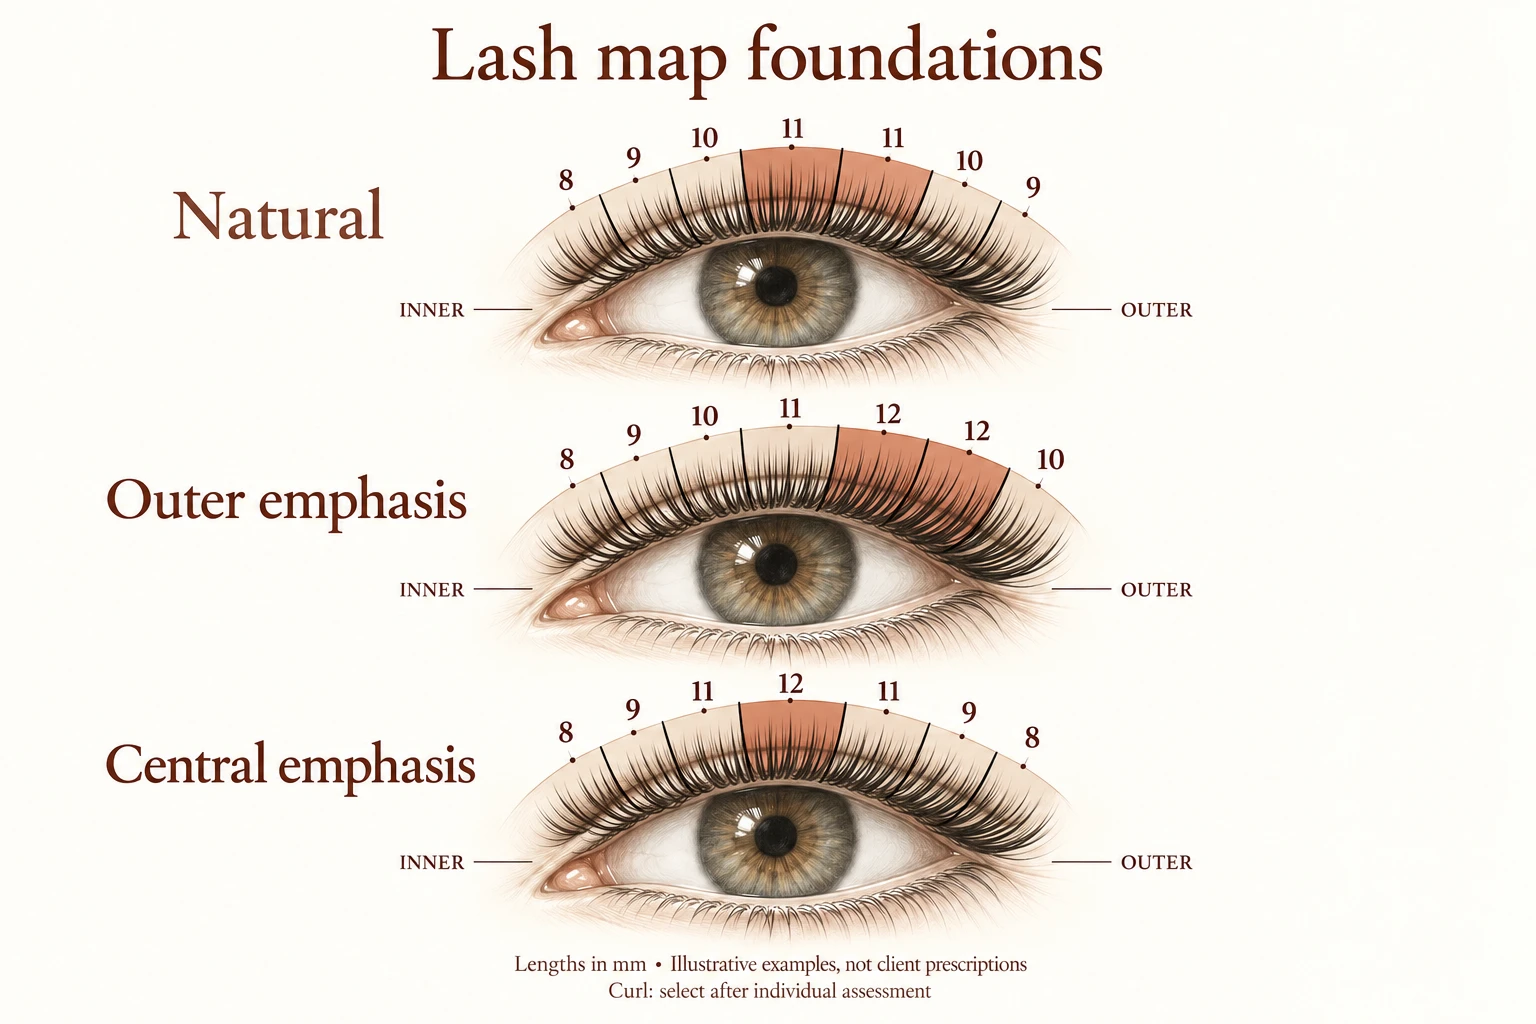
The following sequences are original schematic examples in millimetres, read from inner to outer. They illustrate the location of emphasis using one hypothetical length range. They are not recommended lengths for a particular person, and changing curl, construction or the width of a zone changes the finished appearance.
Swipe left or right to compare all columns →
| Example | Inner → outer zones | Design question |
|---|---|---|
| Natural direction | 8 / 9 / 10 / 11 / 11 / 10 / 9 | Can the outline follow the desired gentle rise without a pronounced peak? |
| Cat-inspired direction | 8 / 9 / 10 / 11 / 12 / 12 / 10 | Does outer emphasis work while leaving room for a shorter terminal section? |
| Doll-inspired direction | 8 / 9 / 11 / 12 / 11 / 9 / 8 | Is the central peak placed where the client wants attention? |
The last number in the cat-inspired example is deliberately shorter than its preceding zones. Outer emphasis does not mean the final corner must carry the longest extension. Equally, the doll example is not defined by a mandatory 12 mm peak. Its identifying feature is the central emphasis relative to both ends.
For the visual vocabulary behind these names, see the lash extension styles and types guide. For detailed central zoning, use the doll eye lash map guide. Keeping the overall style discussion separate from the technical record helps avoid buying a tray simply because its label includes a fashionable name.
Choose the peak, then design both transitions
Begin with the area of emphasis rather than filling every box from the inner corner outward. Decide whether the peak is a narrow zone or a broader plateau. A single long central section and three adjacent sections of equal length can create different outlines even when their maximum length is identical.
Next describe how the map approaches and leaves that emphasis. A gradual transition tends to read differently from a deliberate contrast used for texture. Record intentional contrasts as such, so a later artist does not “correct” them or accidentally repeat them in a smooth set. The transition belongs in the map, not just in the artist’s memory.
Finally review the terminal sections independently. The outermost lashes may have a different direction or capacity from the adjacent section. The inner section may have limited visibility or access. A shorter end can be an intentional part of the design. Filling a visual gap with extra length is not automatically an appropriate response.
Keep length, curl and load as separate decisions
Length is only one part of an extension specification. Curl changes the direction of the tip and the apparent height of the finished set. Construction and diameter affect how the selected component behaves. A map that records only millimetres cannot fully describe a classic set, a volume set or a textured mixture.
Record the actual brand or product line alongside the curl letter. Letter names are useful shorthand, but profiles can differ between ranges. Compare the base, the point where the curve starts and the final sweep on physical samples. Our curl guide and special curl guide explain how to document that comparison.
A curl change should not be treated as permission to increase extension load. Suitability depends on the individual natural lash and the professional application method. If a section cannot support the proposed construction, revise the design or product selection. Do not preserve a diagram at the expense of the actual lashes it is meant to describe.
Map texture and layers without hiding the base plan
A smooth outline needs a different record from a wispy one. For textured work, write the base lengths first, then identify accent positions and lengths separately. “11 mm base with selected 13 mm accents” communicates more than writing 13 mm across a whole section that is mostly shorter.
Where layers are relevant to the technique, distinguish them in the notes. Natural lash rows begin in different positions and can have different directions. An artist may adapt lengths to create a chosen visible outline, but the worksheet should record what was actually selected rather than imply a single number explains every layer.
Do not turn a textured map into a manufacturing claim. A tray marked wispy, anime or angel does not guarantee the finished arrangement. The wispy versus wet-look guide explains how product components and the artist’s placement combine. Keep those distinctions visible when preparing training material or a private-label kit.
Adapt a map to lid space and eye shape
Eye-shape labels help organize questions, but they do not supply a complete answer. A hooded lid describes visible skin coverage; a monolid describes the absence of a visible crease; almond describes the outline. A person may fit more than one description, and their natural lash direction still needs its own assessment.
| Observation | Question for the map | Detailed guide |
|---|---|---|
| Lid fold conceals part of the set | Where is visibility reduced, and how does the proposed curl sit with the eye open? | Hooded eyes |
| Monolid or straight-growing lashes | Which physical curl profile provides appropriate contact and the intended direction? | Asian and monolid consultation |
| Outer emphasis requested | Where should the peak stop, and what happens at the terminal corner? | Fox-inspired mapping |
| Almond outline | Does the client prefer central height, a balanced outline or an outer sweep? | Almond-eye mapping |
Professional educators also present eye-shape maps as starting points rather than identical instructions for every client. LashBase’s eye-type guidance discusses different peak positions and curl choices according to the area being styled. The practical lesson for the record is to note the observation that justified a modification.
Record asymmetry instead of forcing identical numbers
Start with a shared design intention for the pair, then assess each eye independently. If the lid folds, natural lash directions or visible contours differ, identical sequences may not produce an identical visual balance. That does not mean every small difference should be corrected; the client’s preference and the artist’s assessment remain central.
Use separate right and left rows on the worksheet. Record a difference in zone width, peak location or curl where it was intentional, with a brief reason. This makes a future refill or handover more reliable. Simply circling “same as last time” loses the context that made the original map useful.
For photography used in the record, keep gaze, lighting and camera position reasonably consistent and obtain the client’s permission. A dramatic angle can exaggerate an apparent difference that is less noticeable in normal conversation. Compare like with like before deciding that a map needs another adjustment.
Download and use the blank lash map template
Download the blank lash map worksheet · PDF
The one-page worksheet has separate client-right and client-left diagrams, blank sections for lengths, space for curl and construction, and a review area. Use a client reference code rather than unnecessary personal information if the sheet is shared with a supplier or educator. Keep consultation and consent records according to your business procedures.
Print the sheet on A4 or Letter using your printer’s fit-to-page option. Write inner-to-outer values separately for each eye and use the open diagram areas for landmarks or direction notes. The file contains no preapproved treatment numbers. A blank space is intentional: the selection belongs to the trained professional who has assessed the client.
If you prefer an editable starting point, open the free Lash Map Generator. You can select available lengths, edit both eyes, separate base lengths from spikes and export a reference. The tool organizes your choices; it does not assess the client’s lashes or select a clinically suitable treatment.
Why a map does not guarantee retention
A map can help document lengths and construction, but it cannot make a set last a fixed number of weeks or months. Retention is influenced by natural lash shedding, application quality, the adhesive system, preparation, aftercare and the conditions in which the service is performed. A change in the diagram alone does not identify which factor caused a problem.
When reviewing a set, record what the artist actually observes rather than assigning blame from the style name. Note where losses occurred, whether the original choices were altered and any relevant changes in the service process. Compare that record with the approved product instructions. A different map may be appropriate, but it is not a substitute for reviewing the application system.
The American Academy of Ophthalmology’s extension guidance describes eye irritation and other risks associated with extensions. A design worksheet is not a safety certificate. Discomfort or an eye concern should not be dismissed as an expected consequence of choosing a particular look.
Turn an approved map into a purchasing brief
A salon buyer needs enough stock to reproduce approved designs, not just one tray containing the longest length shown in a reference. List the lengths actually used, the curls, the construction and the expected service volume. Separate samples being evaluated from products already approved for routine use.
Map sections do not translate directly into tray-row quantities. Equal-width zones may contain different numbers of suitable natural lashes, and different techniques consume components differently. Record real usage over a representative period, then use that information to choose mixed trays, single lengths and reorder quantities. Keep a buffer based on delivery time rather than a universal ratio.
For private-label development, attach a specification sheet that names the fiber or finish, curl reference, diameters, length assortment, row count, strip characteristics and packaging requirements. A style nickname should accompany that specification, not replace it. The lash specification sheet guide provides the next step.
A practical review checklist
- Both eyes and both ends of each diagram are clearly labeled.
- The requested emphasis and the client’s preference are written down.
- The peak and the two corner transitions can be understood without guessing.
- Curl, diameter and construction are recorded separately from length.
- Base lengths and accents are distinguished where texture is used.
- Any intentional right-left differences have a short explanation.
- Product references match the samples or trays actually used.
- Review notes describe observations rather than promise a wear duration.
For a team, agree on one notation format before collecting many maps. Consistent symbols make records easier to compare and reduce ambiguity during a handover. Keep a revision date so an earlier experimental sequence is not mistaken for the final approved plan. A clear one-page record is more useful than a complicated diagram nobody else can interpret.
Frequently asked questions about lash maps
Is there one best lash map for beginners?
A simple, clearly labeled map can help someone learn to record a design, but it does not replace supervised application training. Begin with the notation and the distinction between shape, curl and construction. Client-specific product selection needs a professional assessment.
Are natural lash maps always the same sequence?
No. Natural describes a visual intention rather than fixed millimetres. The lengths, zone widths and curl still depend on the desired result and the lashes being assessed. A gentle progression is one possible design language, not a universal formula.
Does every lash map need spikes?
No. Spikes are an optional texture component. A smooth natural, doll or cat-inspired outline can be recorded without them. Where accents are used, distinguish their positions and lengths from the underlying base plan.
Can a professional extension map be used for DIY clusters?
The broad idea of central or outer emphasis can be compared, but the products, attachment systems and instructions are different. Do not transfer professional adhesive or application instructions to a consumer cluster kit. Use the product’s intended method and treat any diagram as a separate design reference.
Ready to specify the products behind a mapped range? Browse the eyelash extension collection and send the approved lengths, curl references, construction and packaging requirements through the manufacturing inquiry form. Availability and quotation follow the complete specification.