
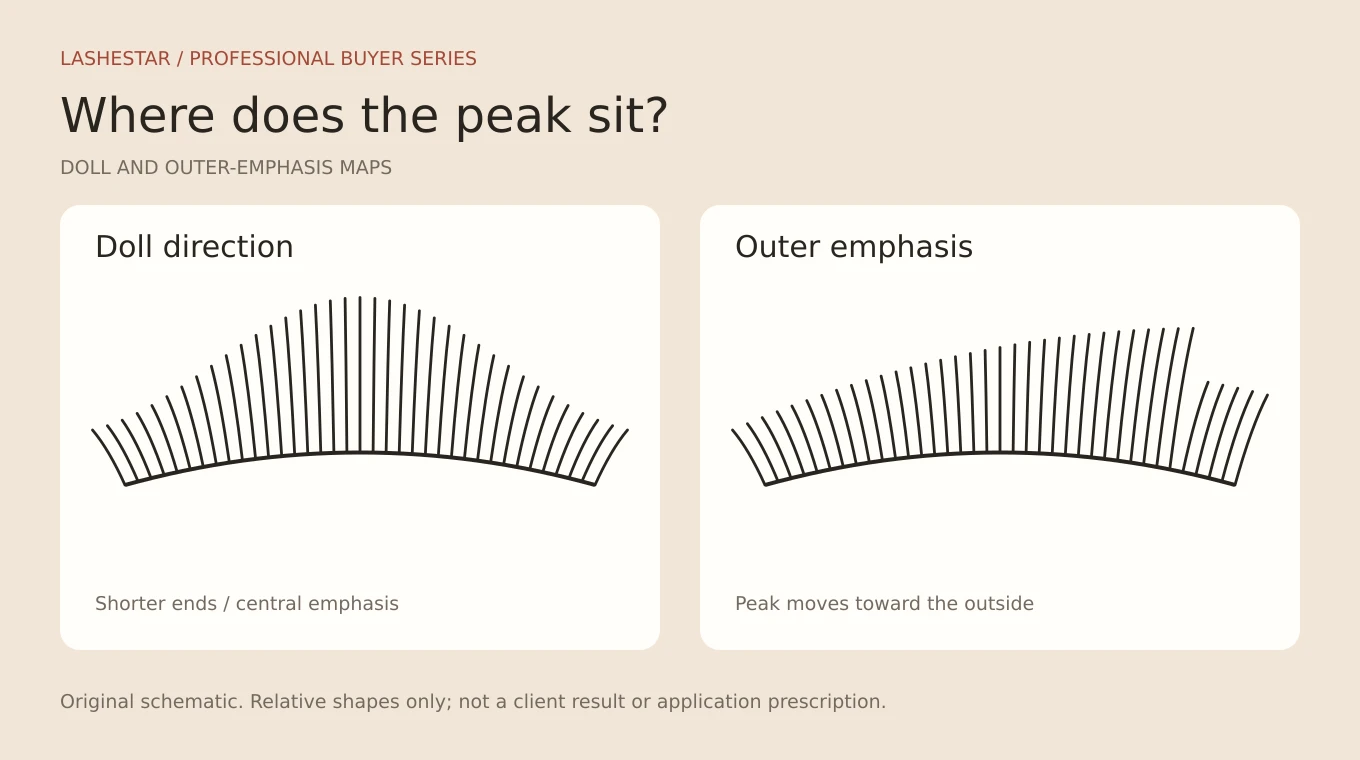
Doll lash extensions place the strongest length emphasis around the central part of the eye, with shorter sections toward the inner and outer ends. The aim is an open, rounded impression. “Doll” describes a map, so it can be combined with classic, hybrid or volume methods and with smooth or textured finishes.
For a salon buyer, the practical requirement is a length assortment that supports the central rise and both transitions. For a brand, the important task is explaining that relationship clearly without suggesting that a tray name automatically creates the finished effect. This guide compares doll and cat-eye directions and provides a sample-planning framework.
What a doll-eye map actually tells you
A map identifies where the emphasis should sit. It does not determine the complete product specification. Two doll-style services may share a central focus while using different curls, densities and textures. One can look understated and another visibly dramatic.
Separate the map from the method in consultation notes. “Doll map, soft textured finish, selected volume components” is more informative than “doll set.” The styles and types guide explains the full distinction between method, silhouette and texture.
The central region is a visual decision on the open eye. It should not be inferred only from the midpoint of a pad or from equal divisions in a drawing. Record a practical reference landmark and allow the trained artist to adapt the map to the actual lash line and the client’s requested effect.
Doll versus cat eye: where is the peak?
| Feature | Doll direction | Cat-eye direction |
|---|---|---|
| Main emphasis | Central region | Outer region |
| Broad visual aim | More open or rounded impression | More elongated impression |
| Length planning | Rise toward the center and shorten toward both ends | Build toward the outside with an individually assessed finish |
| Consultation question | How much central prominence is wanted? | How much outer emphasis is wanted? |
| Stock risk | Missing short transitions or central replenishment sizes | Overstocking long sizes while overlooking corner sizes |
These are design directions, not promises that a style will change the physical eye shape. Ask the client which feature she wants to emphasize rather than assigning a map solely from a category such as almond or round. The natural lash direction and lid relationship still need individual assessment.
A doll eye lash map example
For a planning illustration, divide a single eye from inner to outer into seven zones. An example base sequence is 8, 9, 10, 11, 10, 9 and 8 mm. It demonstrates a central peak and two declining sides. These numbers are an original schematic example, not a recommended map for every client.
A broader central plateau could instead repeat the peak over more than one zone. That changes the shape of the emphasis, even if the maximum length is unchanged. Compare the two concepts in a drawing, then choose the actual sizes through a professional assessment.
For comparison, an illustrative outer-oriented sequence could rise across more zones before tapering at the end. The point of the comparison is the location of the peak, not a contest over which design uses longer extensions. A controlled outer finish remains important in either approach.
Assess the result with the eye open
Closed-eye drawings are useful for recording zones, but the final impression is judged on the open eye. Growth direction, curl and the position of the lid affect what is visible. A neat sequence on paper can still produce a different apparent peak once the eye opens.
During a professional sample evaluation, use consistent front-view photographs alongside any close workmanship views. Keep the camera level and avoid comparing one tilted head with another straight-on image. This makes feedback about the location and breadth of the peak more meaningful.
Where the two eyes differ, record separate adjustments. Mirroring the same numbers is convenient but does not guarantee a visually balanced result. A salon system should let artists document those decisions rather than forcing every service into one fixed template.
Combine the map with a chosen texture
A smooth outline keeps the central silhouette easy to read. A wispy version adds visible height variation above that base. A more graphic anime version emphasizes selected points. These choices change the component brief while preserving the broad central focus.
If a customer likes an anime reference because of the open-eye shape but dislikes strong points, separate those preferences. She may be asking for the map rather than the texture. The anime guide and wispy comparison help distinguish those requests.
For a brand assortment, avoid creating separate technical SKUs for every map name when the physical contents are identical. Explain multiple uses through documented examples and keep the ordering information tied to the actual product.
What lengths should a salon stock?
Start with the service records rather than an assumed universal doll tray. Identify the short transition sizes, the frequently used middle sizes and the sizes used for the peak. Review the curl combinations at the same time because a length without the required curl cannot complete the intended service.
A mixed tray is useful for trial work and low-volume variants. Single-length trays can suit repeat demand once the salon knows its consumption. The central sizes may be used more quickly than the ends, but the exact pattern depends on the service mix and how each map is built.
Build a worksheet with one row per length-and-curl combination. Record the starting quantity, amount used during the pilot and remaining quantity. This simple evidence is more useful than ordering equal quantities of every size because they look balanced on a purchasing sheet.
Curl and diameter belong in the sample brief
A map only supplies the location of the intended emphasis. It does not decide how far the fibers project or how visually dense they appear. Compare the actual curl profiles and component constructions used in the proposed range. The same printed curl letter is not enough to prove equivalence between suppliers.
Record nominal diameter together with the product format. A single extension and a multi-fiber fan cannot be compared by one diameter label alone. For volume, fan count, spread and base construction also matter. See the Russian volume guide for the method distinction and the premade fan guide for finished components.
Evaluate a private-label doll-style assortment
- Define the target service and show the intended central emphasis.
- Choose whether the reference is smooth, wispy or graphic.
- List the required base sizes and any separate accent sizes.
- Confirm curl samples, component construction and pack allocation.
- Ask trained testers to evaluate the intended workflow and result.
- Review consumption before approving replenishment quantities.
Keep the diagram, written specification and retained samples together. If a later batch looks different, the team can determine whether the change came from the physical component, the map or the photographic conditions. Without that separation, feedback tends to collapse into vague comments about one batch looking “less doll-like.”
Common mapping and purchasing misunderstandings
The longest size is the whole style
The rising and falling sections define the relationship around the peak. A pack containing only the longest sizes does not provide the full design. Short transition sizes deserve a place in both the sample kit and the replenishment plan.
A central peak must be one narrow point
The emphasis can be a narrow peak or a broader region. The right choice depends on the reference and professional assessment. Make that choice explicit so two artists do not interpret the same map name differently.
A doll tray guarantees an open-eye effect
The result depends on placement and the individual as well as the product. Describe the tray’s actual contents and show the map as an example of use. Avoid a universal transformation claim on a wholesale product page.
Write a complete map note
A practical note includes the date, reference image, intended central emphasis, base sequence, separate accent sequence where applicable, curl samples and component codes. Add the artist’s final adjustments for each eye. This makes the drawing useful at the next consultation rather than a decorative worksheet.
For a brand sample programme, remove client identifiers before sharing the technical record. The supplier needs the product requirement and permitted reference imagery, not the client’s personal details. Keep the final approval linked to the product sample code.
Questions about doll lashes
Are doll lashes the same as anime lashes?
No. Doll describes central emphasis, while anime describes a more graphic styling direction. They can be combined, but either term alone leaves important details unspecified.
Can a doll map use classic extensions?
Yes, the map and method are separate choices. The trained artist decides the suitable components. For purchasing, document the method so the supplier does not assume the brief requires finished fans.
Should both eyes use identical numbers?
Not automatically. The goal is an appropriate individual result, and the eyes may require different adjustments. Record each eye when the artist changes the plan.
Where can I record the map?
Use the Lash Map Generator for a planning record, then save the final professional adjustments. For a wholesale assortment, browse lash extensions and request samples with the complete component list.